STEPS
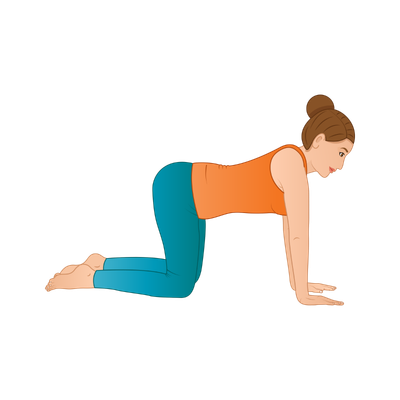
Table Top Pose, or Bharmanasana, is one of the main pose in a Yoga practice. It shows up a lot in sequences, especially in the beginning, as it helps build body awareness, stability and connection with the breath. It’s an active posture that strengthens the arms, shoulders and core, and prepares the body for movements like Cat-Cow and Downward Facing Dog.
How to do Table Top (step by step)
- Starting position: Begin with your hands just below your shoulders and your knees aligned with your hips.
- Hands foundation: Spread your fingers wide and root the whole palm into the ground. Distribute the weight, avoiding putting all your weight on your wrists.
- Spine alignment: Keep your back neutral and long, without letting the lower back sink or rounding too much. Let the body find a natural balance here.
- Core activation: Gently draw the navel in towards the spine to support the posture and protect the lower back, without creating tension.
- Shoulders and arms: Push the floor away with your hands, activating the arms and shoulders. Slightly protract the shoulder blades, without collapsing between them.
- Neck and gaze: Keep the neck long and relaxed, with your gaze down to the floor, in line with the spine.
- Hips stability: Keep the hips stable and stacked over the knees, without shifting your weight to one side.
- Final position: The body forms a steady “table”, back parallel to the floor, strong base, the wrists and knees are firm, and the breathing is light.
- Coming out: From here, move into your next posture with control, staying connected to your body.
TEACHER QUEUES
VISUALIZATION COMMENTS
- Press your fingers into the ground, keeping them active and pushing down, shifting some of the weight from your wrists to your hands so as not to strain them. Align your wrists with your shoulders, keeping them in line with and at the same width as your shoulders.
- Find a neutral point — not leaning too far forward or back
- Activate the shoulders, don’t collapse
- Keep the back long, avoid dropping into the lower back
- Push the floor away with the hands
- Gently engage the core without holding the breath
- Relax the neck, gaze down
TECHNICAL COMMENTS
To avoid overloading the wrists, press firmly through the base of the fingers, creating a “claw” with the hands. This helps shift some of the weight into the fingers, distributing the load more evenly instead of dumping everything into the wrists or the outer hands.
Wrists aligned under the shoulders, with the hands shoulder-width apart.
Knees stay under the hips, about hip-width distance, creating a stable base.
Find a neutral position in the body, not leaning forward or back, keeping the weight distributed between hands and knees.
Table Top is a base for movements like Cat-Cow and many transitions. That’s why keeping wrists under shoulders and knees under hips is key for a neutral, stable and safe alignment throughout the practice.
BENEFIT COMMENTS
- Strengthens arms, shoulders and core
- Improves body awareness and alignment
- Prepares the body for other postures
- Builds stability and coordination
WATCH OUT FOR
- Dropping into the lower back (too much arch)
- Collapsing in the shoulders
- Tension in the neck
- Too much weight in the wrists
CONTRAINDICATIONS
- Wrist or shoulder injuries
- Sensitive knees
MODIFICATIONS
- Place a blanket under the knees
- Bring the wrists slightly forward of the shoulders to reduce pressure, or make fists to decrease wrist load
- Use blocks under the hands
VARIATIONS
- Cat-Cow movement (flexing and extending the spine)
- Lift one arm or one leg (Bird Dog)
- Move the hips in circles
- Practice with toes tucked or untucked
(can be done before, during or after)
If you feel too much weight in the wrists, you can do some variations within Table Top.
You can turn the hands, bringing the fingers back towards the knees, creating a different stretch through the wrists and forearms.
Another option is to place the back of the hands on the floor, with the palms facing up. Here with less weight and more control.
You can also gently shift the body forward and back, exploring wrist mobility in a controlled way.
These adjustments help prepare the body and prevent overload during the practice.
YOGA COUNTER POSES
After Table Top, you can move into shapes that help release the body and balance the effort:
- Balasana (Child’s Pose): relaxes the spine and releases shoulders and arms
- Adho Mukha Svanasana (Downward Facing Dog): stretches arms and back while activating the body
- Marjaryasana–Bitilasana (Cat-Cow): brings mobility to the spine and releases tension
Written By: Amanda Nunes
Amanda Nunes is a RYT 200 yoga teacher and digital marketing professional. After living in Australia, Bali and traveling across Asia, she completed her yoga teacher training in India. Now back in Brazil, she shares her work through yoga, movement and creative digital projects, inspired by nature and a simpler way of living.
For inquiries, you can reach her at: nunesamanda86@gmail.com

JOIN OUR NEWSLETTER
- Class planning tips
- Pose instruction articles for teachers
- Marketing, student retention and management tips