STEPS
Place the right hip next to the wall. Bend the knees toward the chest. On an exhale, using the elbows for support, begin to bring the lower back down to the floor and swing the legs up the wall. (Please note: Students can get into this pose by starting on the left hip as well.)
Once the legs are up the wall, begin to slowly release the entire back down to the floor by straightening the elbows.
Stay in this for as long as it is comfortable. Generally, 5 to 20 minutes works well.
When ready to come out of this pose, bend the knees toward the chest and roll over to one side.
TEACHER QUEUES
VISUALIZATION COMMENTS
If the hips don’t touch the wall when you swing your legs up, try to “shimmy” one hip at a time until your hips are closer to the wall or are touching it. If, after “shimmying,” your hips are still more than 7 to 10 inches from the wall, please try the modification listed below.
TECHNICAL COMMENTS
While you are in this pose, picture a line running down the center of the body from the head to the feet. Then, arrange the body symmetrically according to the center line.
BENEFIT COMMENTS
- Increases circulation by “reversing” gravity.
- Relieves feet and legs.
- Can help improve or eliminate varicose veins.
- Stretches the backs of the legs.
- Relaxes the mind and body.
WATCH OUT FOR
- Hyper-extension of the knees.
- Compression in the neck.
- Try to keep the gaze up at the ceiling or close the eyes.
CONTRAINDICATIONS
Not recommended for students with:
- High blood pressure.
- Heart disease.
- Stroke
- Serious neck or shoulder pain
- Menstruation (Use your own judgement with this.)
MODIFICATIONS
If there is a significant amount of space between the straight legs and the wall, the teacher should stack 3-4 bolsters behind the straight legs to “remove” the space. This way, the student can fully relax in this pose without fear of hyper-extending the knees.
VARIATIONS
- To stretch out your inner thighs, you can separate your legs to a “V” shape during Legs-Up-the-Wall. You also can bend your knees to either side and touch the bottoms of your feet together as you do in Cobbler’s Pose. Much like Cobbler’s Pose, you are trying to bring the heels as close to the pubic area as possible.
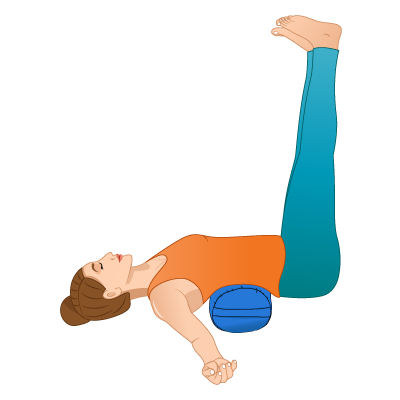
- Try this pose with a bolster placed underneath the hips to make Legs-Up-the-Wall a restorative pose. Begin by placing a bolster approximately 4 to 6 inches away the wall. (Note: Bolster is parallel to the wall.) Place right hip against the wall while sitting on the right end of the bolster.* Next, exhale and swing the legs up the wall and slowly lower the back toward the floor. (This is a slow and controlled movement.) Remember to use bent elbows for support as you lower the back to the floor. The bolster should be situated underneath the lumbar spine and, if comfortable, the tailbone can occupy some of the space between the bolster and the wall. Folded blankets work well for this, too.
- (*If students prefer to start with the left hip and the left end of the bolster, that is fine.)
YOGA COUNTER POSES
This pose the usually done near the end of class. Corpse pose or any other deeply relaxing or restorative pose would be appropriate.
Written By: Amber Kocian RYT
Amber encourages students to test their limits, but gently reminds them to listen to and respect their bodies as they are each day. She believes that a safe, consistent yoga practice has the power to help anyone in every aspect of their lives.
Website: ambersyoga.wordpress.com

JOIN OUR NEWSLETTER
- Class planning tips
- Pose instruction articles for teachers
- Marketing, student retention and management tips